
by Scott Woerth in the June, 1988 RootesReview (a reprint of a 1982 Tech Tip)
Many of you out there own a Mark II Tiger that no longer has the side stripe(s) on it. I recently owned a Mark II with the original stripe and took the time to carefully measure it before selling the car.
As far as I know, the stripes were always white with black between them, except on the white cars which had black stripes. The illustration shows the dimensions for the width of the stripes.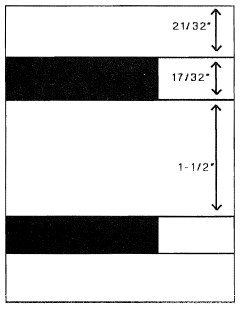
Alignment
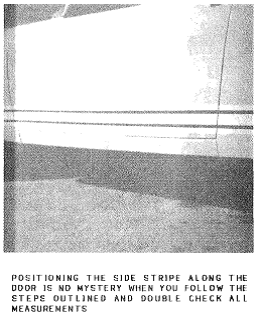
Now, for the fun part: getting a straight looking stripe painted on the car. This is made more difficult because the bottom edge of the door is curved. Start by making a mark with a felt-tip pen 1-1/16th inch from the bottom, center of the door. Place the edge of a yardstick on the mark and position it so that it is equal distances from the bottom of the door at both the front and rear. Make your straight line on the door with the pen, then continue it onto the front fender and quarter panel in front of the wheel well.
Next, tape a string on the line at the front of the door and, keeping it on the line, stretch it back past the rear wheel well onto the rear quarter panel. Holding the string against the car, make three or four marks at equal intervals as a guide for a straight line on the quarter panel. Using 3/4 inch masking tape, mask off this bottom edge on the stripe. Now, measure up from your bottom edge 3-7/8 inches and mark this about every six inches as a guide to mask off the top edge of the stripe. Stop the stripe at the rear on the seam extending down below the taillight.
Painting
After using paper to mask the side of the car, sand the area with a 3M Scotchbrite pad or fine sand paper, taking care not to disturb the tape edge. Paint the entire 3-7/8 inch area you just prepared with a pure white, not a yellow or off white shade. I like to use an acrylic enamel instead of lacquer, but you will have to let it dry two days (minimum) before taping it off for the black, whereas lacquer could be taped over in a few hours.
 After the white dries, cut a piece of thin cardboard the width of the total stripe and mark the four dimensions in the illustration on the vertical edge. Now, holding your template on the stripe, move it along making the four marks every six inches to guide your taping. Using 3/4 inch tape, again mask the 1-1/2 inch center white stripe with two widths of tape side by side. Leaving a 17/32 inch gap above and below the center stripe, tape off the two outer white stripes.
Sand and paint the two unmasked areas black, allow to dry overnight and carefully pull the tape and paper off to reveal your factory-looking stripe!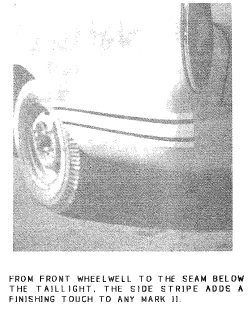
Another Take
by Bob Rhodes in the 1977 RootesReview:
The actual dimensions of the Sunbeam Tiger MK II side “racing” stripes are:
Top and bottom stripes are each 11/16 of an inch wide, middle stripe is 1-1/2 inches wide, separations between stripes are each 9/16 of an inch. They are positioned so that the vertical center of the middle stripe is in line with the vertical centers of the front and rear bumpers.
And Another
Graham Vickery discussed the origin of the stripes in the July 2015 RootesReview available in the Members Only section.