
by John Logan in the May 2007 RootesReview:
Why should I put disk brakes on my Sunbeam? Do you wish your Sunbeam had more rear braking power? Would you like to eliminate brake adjustments, maintain short pedal travel and have self-adjusting emergency brakes? If so, consider replacing the rear drum brakes with disk brakes.
I chose the early Mazda RX7 12A rear disk brakes because they dimensionally lineup with the axle ends of the Sunbeam and will fit within the 13 inch wheel. The Mazda RX7 with the B 13 engine has larger disks so it will require larger adaptor brackets and the use of larger wheels. The availability of used parts is not easy but they are still cheaper than available kits. If you use stock Sunbeam pads on the front and stock Mazda pads on the rear, the brakes will be well balanced and the car will not need a proportioning valve.
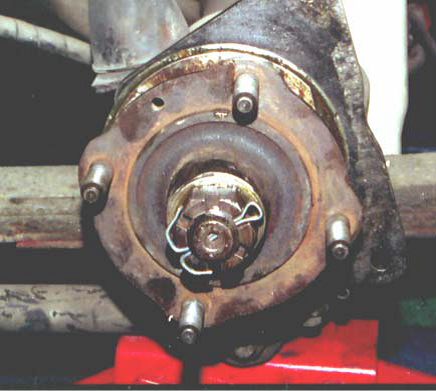
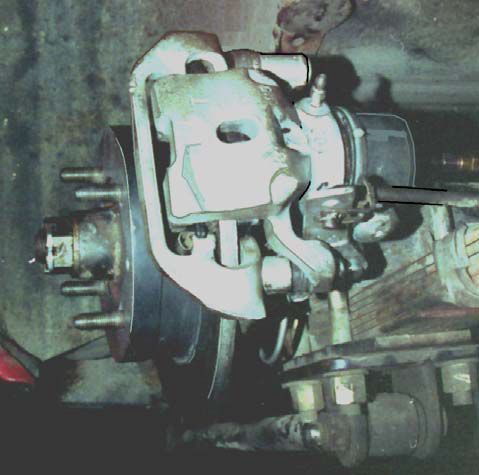 This picture shows the Mazda rear brake mounted on a Tiger axle. Adapting the brakes requires only a flat adapter and the machining of the disk. Since the brakes on an Alpine differ only in the backing plate mounting bolt pattern at the axle and a smaller axle tube diameter, the conversion should be the same except for the requirement of a different adapter plate.
Price
Before we go any further, I’m sure you want to know how much this modification could cost. There are several levels you can go when buying parts so I made up the table below based on some recent (March, 2007) purchases and a few estimates. Level 1 is based on mostly used junkyard and swap meet parts. Level 2 uses new and rebuilt parts and level three includes some high performance parts. E-bay may drive these up. Junkyard/swap meet prices and quality vary a lot, but with careful hunting and shopping you can find some good deals. Just make sure you get all the attaching bolts and ant-rattle springs.
| Parts | Level 1 | Level 2 | Level 3 |
|---|---|---|---|
| Rotors used, resurfaced and machined | $52 | ||
| Rotors new stock, machined (pair) | $100 | ||
| Rotors, cross drilled, slotted and machined (pair) | $120 | ||
| Used calipers with mounting brackets anti-rattle springs and attaching bolts (pair) | $40 | ||
| Used caliper mounting brackets anti-rattle springs and attaching bolts (pair) | $10 | $10 | |
| Anti-rattle springs and attaching bolts (pair) | $15 | $15 | |
| Calipers rebuilt including core charge (pair) | $282 | $282 | |
| Stock pads (pair of wheel sets) | $12 | $12 | $12 |
| Used emergency cables | $5 | $5 | |
| New emergency brake cables (pair) | $32 | ||
| Rubber brake lines for calipers (pair) | $21 | ||
| SS flexible brake lines for calipers (pair) | $60 | $60 | |
| SS flexible brake line for axle (one) | $30 | $30 | |
| Adapter bracket machining estimate (pair) | $100 | $100 | $100 |
| Misc bolts, clamps, etc. | $20 | $20 | $20 |
| Total | $250 | $634 | $681 |
| (Caution: this table uses 2007 data. Current prices may differ) |
Recommended Steps
If you can, go to a Mazda dealer or a foreign car parts store and look at the exploded views in their parts book to understand how the brakes are assembled and what the parts you will need look like. Also, find a Sunbeam manual and figure out how to remove of the drive flanges and backing plates from the rear axles.
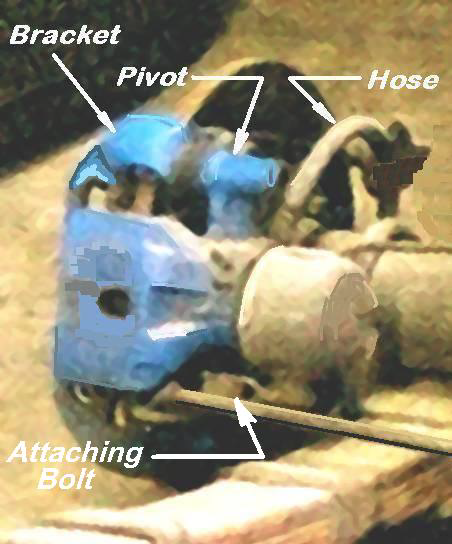
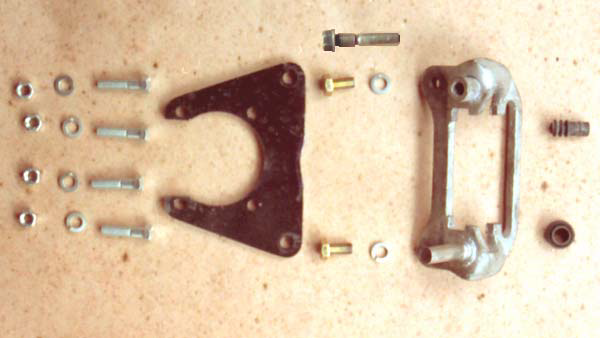 Decide what level you want to go and buy the 12 A calipers and disks. Rebuilt calipers won’t have the mounting brackets, emergency cables and such things as attaching bolts and anti-rattle springs you need (see photo) so I recommend you try to find them find them at a junkyard.
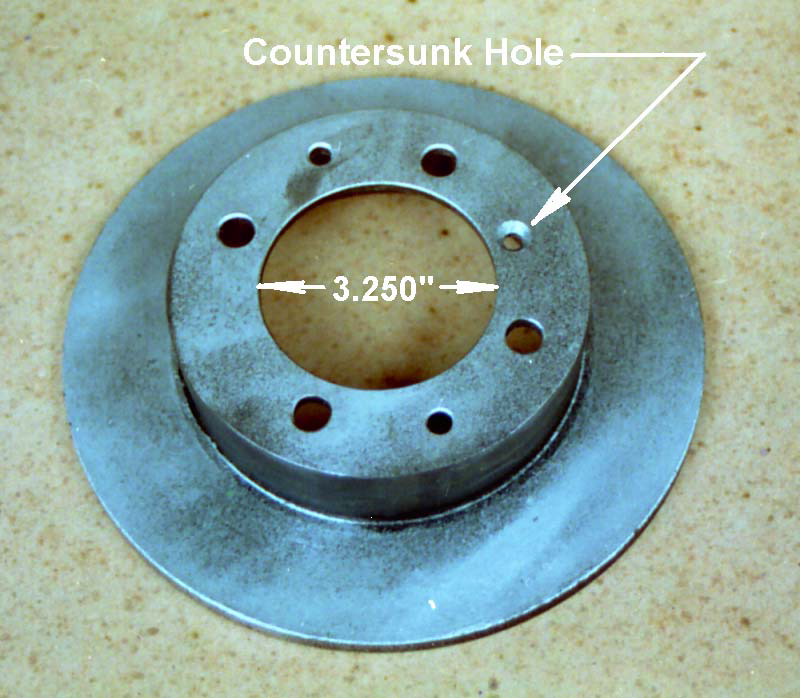 Machine the disk centers to 3.250” diameter, which is the same as the Sunbeam drum pilot. They should fit tight on the axle flanges like the drums did. I recommend a small chamfer on the inner edge to help the installation.
The stud holes in the Mazda are on a 110 mm or 4.33″ diameter. The Sunbeam holes are on a 4.25″ diameter. That’s only .04″ per hole, so you can file the holes towards the inside to make the disk fit. This is not critical, since the pilot is what locates the disk.
To drill the countersunk screw hole, locate it by placing the Sunbeam drum against the machined Mazda disk and line up the wheel stud holes. Transfer the hole location onto the disk, drill the hole and counter sink it to the same angle as the screw.
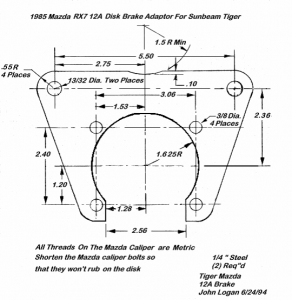
If you are using 13″ wheels, you may need to grind the flash on the caliper “parting line” for clearance. Machine the two adapter plates according to the drawing on page 8. If you can find someone with a computer controlled laser cutter and can program it for his drawing, they will come out great.
Drain the brake system and remove the rear wheels and drums. Following the Sunbeam manual, remove the axle hubs, bearing retainer plate, shims and old backing plates and cylinders. Yes, this can be a tough job.
 Fit the adapter plates to the inside surface of the axle flange making sure they fit flush to the surface. You may need to do some filing and smoothing on the axle or the adaptor. The calipers will be at the rear side on a 45º angle for leaf spring clearance. Follow the Sunbeam manual and reinstall the bearing retainer plate, oil seal container, shims, etc. using grade 8, fine thread bolts that are the same diameter as the original Sunbeam bolts. The original bolts should be long enough to reuse.
Install the mounting brackets to the adapter plates, noting that there is a left and right. Use grade 8, fine thread metric bolts that fit the thread of the brackets. When you install the bolts, make sure they are flush to the brackets. If you use the original Mazda bolts, they must be shortened so they don’t touch the disks.
Next, install the calipers. If you have used calipers you must turn back the parking brake adjustment by turning the disk with the notches on the piston. Clean and grease the sliding surfaces and make sure the boots are in good condition. Slide the calipers on the upper pivot, install the lower attaching bolt and check clearances. If there is a problem at this point, something is installed wrong.
Remove the lower attaching bolt, swing the calipers up on the bracket pivot and install the disks. This works like any modern disk brake. Temporarily bolt the disks solid to the axles using two wheel nuts backwards on the studs so you can check the installed clearances. You may need washers on the studs so that the nuts don’t bottom out on the un-threaded shank of the studs.
Swing the caliper up again, install the pads and an anti-rattle spring, lower it, install the attaching bolt, and torque to 22 to 30 ft. lb. Check all clearances.
 Hopefully, you are familiar with disk brake operation and know that the shoes slide towards the disk under pressure and what the proper clearances should look like, taking into account the pad wear. If for some reason there are problems at this point you may need to shim something.
Once everything looks good then you need to adapt the hydraulic lines to the caliper hose. The caliper must be able to swing away to replace the pads or remove the disk without disturbing the hydraulic system.
You will need a rubber or stainless braided hose with a loop that allows for movement. You can get Mazda hoses at the dealer, parts stores or one of the suppliers shown below.
| Affinia Amico | Honeywell Bendix | Affinina Raybestos | Federal Mogul Wagner | ||
|---|---|---|---|---|---|
| Rotor | 31023 | 141253 | 9828 | BD60698 | Tek Trinh Sales Manager R1 Concepts Inc. 5540 E Lapalma Ave. Anaheim, CA 92807 Robert Birdsong 456 E. Juanita Avenue Suite 1 Mesa, AZ 85204 800.279.5880 reb@partsprofessional.com |
| Caliper Right (1) | R927785 | R46608 | FRC3577 | CR107505 | |
| Caliper Left (1) | R927786 | R46609 | FRC3578 | CR107504 | |
| Pads (Set of 4) | PF235 | D235 | PGD235 | PX235 | |
| Emergency Cables (2) | C916284 | BC93303 | BC123015 | ||
| Hose Upper (2) | B917128 | 77343 | BH38233 | BH107258 | |
| Hose Lower (2) | B917318 | 77342 | BH38456 | BH111145 |
There are adapter fittings available at good parts stores for mating the Sunbeam lines to the Mazda hoses. At this point you will have to get creative in the process of bending the metal lines to mate with the hoses and attaching the hoses securely to the axle ends.
Once everything is put together, put in the fluid and bleed the system. Check all clearances, mount the wheels and gingerly take it out for a ride. After a few miles of operation and a few hard brake applications, check the brakes again and re-torque all bolts.
Now you will need to install the emergency cables. I doubt that you will want to do it the way I did using a complicated system of levers instead of the Mazda cables, so you will have to figure out a way to mount the cables to the axle in line with the Sunbeam equalizer rod and rework the rod to attach to the cable ends. If you have a problem in this area, I will rework my car and describe it to you in a future article.
Comments (6)
Hi,
I realize this was a long time ago but, did you use front rotors on this conversion? I tried the part number listed but they all had a lip on the center of the rotor. The front rotors do not have that lip.
This article pertains only to adapting early Mazda RX7 12A rear disk brakes to Sunbeam Tigers and Alpines. The stock front disk brakes were not modified.
The article describes how to modify the Mazda disk in detail. There are no lips on the braking surface of the Mazda disk.
John,
I got that this conversion is for rear brakes. My problem is finding rotors like the picture you used when explaining the diameter needed to be 3.250 inches. The rotors I am looking at have a center that is about 2 inches in diameter and an inch and a half talk. That is all I can find.
Thanks, coy
John,
I understand that this conversion is for rear brakes. My problem is finding rotors like the picture you used when explaining the diameter needed to be 3.250 inches. I checked the part numbers you listed but they all appear to have a center section about 2 inches in diameter and almost 2 inches tall
Thanks,
Coy
Thanks, coy
I used the Mazda disks and and machined the hole to 3.250″ as described in the article.
John
This is a great article on rear disc for the Alpine and Tigers.
Just saw this article for the first time. I have developed a kit for installation of rear disc for our Alpines and Tigers. If interested send me an E-mail to: ti*******@gm***.com
Here is a link to my PDF that covers details on the Rear Disc Conversion for the Sunbeam:
https://docs.google.com/document/d/1ufxDssxyhCOTSqlMQfcO_g7N2BYXFFTf